PhotobucketPhotobucketPhotobucketPhotobucketPhotobucketPhotobucket

Tuesday, March 22, 2011

Reading Bieber Tweets in a Comfy Chair

If you're following my Tweets you know that my chair from Tar-jay arrived and you also know I'm in love with it.

If you're not following my Tweets . . . I'll try not to take it personally. You know I'm ultra sensitive right now, being nine months pregnant and all . . .


You can just click on that little Twitter button in the top right of my page and follow, which would make me happy because I get an email telling me when new people follow my Tweets.  I like to know someone other than my mom gives a hoot about what I'm doing every day.


Anyway, my goal in finding a rocker was to find one that could eventually be moved out of the nursery and become a permanent piece of furniture somewhere else in our house.  So many gliders look like they belong in a nursery and look displaced if you try to put them anywhere besides the nursery..
 
I considered just getting a really beautiful antique rocker, but I wanted something really super comfortable and although I love old rockers, they sometimes hurt my tush if I sit in them for too long.
 
So I found this rocker at Target online but I was nervous it was going to be a big pile of junk when it arrived at my house.
 
I was also nervous about the color of the chair because I wanted a cream color and the Target website listed it as "tan" but it was really more of a soft beige or a dark cream.  It's perfect.


It was $399 but it's worth every penny . . . and NO, I'm not getting paid or reimbursed or receiving anything from Target for posting this.  I just want you all to know you don't have to spend $1500 at Pottery Barn to get a decent, comfy rocker glider.

Most of all, I love how soft the fabric is.  Imani and I have been snuggling up in that big chair and reading every night before she goes to bed.  Breaking it in before little Noah arrives . . .

Sometimes I just sit in there by myself and relax . . . or catch up on my emails or read my favorite Tweets from people on my phone.

If you don't have a Twitter account, I'd highly recommend it, even if you don't want to Tweet. It's fun to read other people's Tweets. I'm a bit addicted, actually (does that surprise you?).  I never thought I'd like it but I'm totally in love with Twitter.

I like it far more than Facebook.You can get the inside scoop on all of your favorite blogger's lives

or politicians

or famous musicians . . .

it's pretty cool.

Oh, and yes, I follow Justin Bieber's Tweets.  I blame Imani because we went to see Never Say Never 3D and she learned all about how much he uses Twitter and how he announces his concerts and appearances on Twitter so she begged me to follow him.

So I did.

And I secretly wanted to because after I saw the movie, there was something I really liked about the boy.  Did you see it?

But now, I might drop him from Twitter.

He always re-tweets what a bunch of his fans post about him and it's kind of annoying.  I'd rather read what he has to say than a bunch of retweets from people saying how much they love him.

But mostly it's annoying because he hasn't retweeted any of my tweets or my sister's tweets or Imani's tweets.

Like when Imani played "Happy Birthday" on the violin for him because she heard he wants to learn how to play the violin.  

How could he NOT retweet that?


So yeah, JB is getting dropped from Twitter now . . . not that he'll notice but still.

Anyway, I'm so glad the chair from Target is a keeper.  I was so nervous I'd have to return it and suck it up and buy the Pottery Barn rocker that I've coveted for so long, even though it would take a big ole bite out of our savings account.  I'm still debating if we should get the ottoman to go with the rocker. I don't want to take up too much space in the nursery, but it would be nice to have something to put my feet up on.

It's $169.99 too.  Uggh. 


I'm gonna go sit in my rocker now and drop JB from Twitter.


Monday, March 21, 2011

What's Hanging & Baby Name Revealed

We've made so much progress around the nursery and it's basically complete! I'm sorry I haven't updated you all in a week . . . I've just been busy wrapping things up at my job before I go out on maternity leave.

I'm due on Thursday of this week and I am trying to work right up until I deliver so that I can take my time off with the baby.  I get 12 weeks, and I'd like all 12 to be at home with him, rather than sitting around the house waiting . . .

I figured I'd share what we've hung on the walls this week in the nursery.  I tried to incorporate things that were meaningful and not just random art work from Target.

So first, I bought a shelf from AC Moore and had Jason prime it and paint it Valspar's "Honeymilk".


Then, he drilled holes and put the same drawer pulls in that we used on the dresser.


My mom dug out my old baby shoes and we placed them on the shelf.


Along with this bear that I knitted for the baby.


And I found this adorable sign at TJ Maxx for only $4.99.


We hung up one of his little sweatshirts on the middle hook.


For my baby shower, my mother in law and her boyfriend purchased our Pottery Barn bassinet for us . . . but since it was on back order, she drew this beautiful picture to let us know it was coming soon.  It was too thoughtful and beautifully illustrated to throw away or stuff in a drawer somewhere, so I framed it as a keepsake.


I also finally took the time to figure out how to use my new Silhouette machine and I made this alphabet art.  I printed the letters from the baby's name in brown  . . . and  no, his name is not "Ahno."  Can you unscramble them to decipher his name?


Well in case you didn't figure it out,  here is his name in vinyl on the wall.  The frame was a junking find from last summer and Jason painted it in Valspar's "Honeymilk" to match the shelf.   You can see it in it's original color here where we used it to decorate for Halloween.


I'm so happy we finally settled on a name!  And that's what we have hanging around on the walls of the nursery.   I might add a couple more pictures if I can get it together before he arrives, but I'm not sure. I don't want to clutter the space either. 

Oh, and Jason's been one busy boy finishing our bedroom wall and painting our downstairs bathroom.  I think "nesting" has hit him too.   Stay tuned!


Sunday, March 13, 2011

Nursery Progress: Making a Mobile

I knew when I started planning the nursery that I wanted to have some sort of homemade mobile but I didn't know where to begin.

I googled homemade mobiles and found a lot of mobiles made from branches, which I thought were beautiful, but weren't really the look I was going for in the nursery.


Little Slices of Green

I wanted something a little more delicate and I came across this beautiful butterfly mobile/chandelier at Pottery Barn for $59.


It was nice, but I didn't really want butterflies . . . and I didn't want to spend $59.


Then I came across this beautiful ribbon and flower mobile/chandelier at Pottery Barn.  It was no longer available for purchase (and I'm certain I wouldn't have liked the price tag anyway).


Luckily, I found a great tutorial for a knock-off version of Pottery Barn's Mobile at Living With Lindsay.  Lindsay created a similar version of the PB chandelier but she used birds.  It turned out beautifully.


Image: Living with Lindsay


And as much as I loved Lindsay's mobile, our theme in the nursery is the Pottery Barn Lambs, so I didn't know how to make a million lamb cut outs.  I also knew I wanted our mobile to be smaller.

So I decided to stick with the flowers and incorporate the colors of  cream, blue and beige.

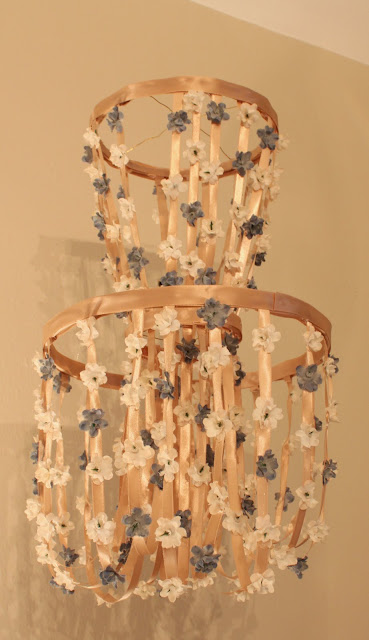
First, I bought three embroidery hoops in small, medium and large.  I took them apart and used the inside of the rings.


I also bought ribbon


And seven bunches of artificial flowers in blue and white.


Finally, I purchased some invisible thread.


I began by taking some low-gauge wire I had at home and making a cross on the inside of the two smallest  hoops.


Next, I connected the hoops using invisible thread.  I put the medium hoop on top, the largest hoop in the middle, and the smallest hoop on the bottom.  This was very tedious and I will warn  you that it was frustrating working with the invisible thread because it's so hard to see.

Once I got the hoops in the order and balance that I liked, I hung the mobile across a yardstick between two chairs so I could begin gluing the ribbon on.


Using a hot glue gun, I started by gluing ribbon to the top hoop, looping it down through the second hoop and then back up to the bottom hoop, where I glued it again.


I intentionally made my ribbons of differing lengths because I wanted the bottom of the chandelier to have different lenghts of ribbon to add dimension.


Next, I cut the flowers off of their stems and glued them randomly on the ribbons.  Imani helped a lot with this part and she had so much fun knowing she was helping to create something for her little brother.


When I was finished gluing all of the flowers on, I had to go through and pick off a lot of excess glue but I was happy with the way the chandelier/mobile turned out.


Jason then had the fun job of hanging it in the nursery using the invisible thread.


I will say that the invisible thread is amazing because it's so hard to see, but it's also a pain to work with.


And there it is . . . my smaller version of the Pottery Barn Chandelier, with colors that match our nursery.


I might cover those wires with ribbon or paint them to blend in more.

It won't be much longer and there will be a little baby looking up to see this.


I'm so excited I can hardly stand it!


Tip Junkie handmade projects


Today's Creative Blog

Spunky Junky

The DIY Show Off

Friday, March 11, 2011

Nursery Update: Window Treatments

After I posted the Nursery Mood Board and got so much feedback, I knew I wanted to add splashes of blue to the nursery to add an element of whimsy to the neutral tones.

I just wasn't sure I wanted a "baby" blue.

So I set out to find fabric and I knew when I saw the bolt of polka dotted blue and brown fabric in Hobby Lobby that it would become the nursery curtains.

The challenge was, I didn't want to sew them . . . so after looking around online, I found a great tutorial over at Young House Love that I decided to try.

First, I rolled out the fabric using my 8 ft living room rug as a guide just like Sherry did-- no tape measure needed!


Next, I used some "stitch witchery" iron on adhesive to hem the edges without using a sewing machine!

It was so simple.  I just placed the heat tape along the polka dots to ensure that the seam would be straight, like this:


Folded the fabric over the tape like this:


And then I used my iron to bond the fabric and create a nice, straight edge. 

This is far straighter than I ever would have gotten if I tried to use my sewing machine.


We used those nifty little hanging clips to hang the curtains.  What I like most is that if the baby pulls on the curtains, the curtain will come down, but not the whole rod . . . so it's sort of a little safety element built right in.


Oh, and Jason moved the curtain rods up higher above the window and out further. We felt like idiots that we had hung all of the curtains in our house so low and close together.  I never knew this little secret until I started reading so many home improvement blogs, even though my sister once told me that curtains should be hung up high and wide above the window.

Have I mentioned that she's always right?

Anyway . . I'm loving the splash of blue in the nursery and I'm loving that the fabric matches the drawer pulls so perfectly.


And in case you're wondering, I made four curtains for less than $20 a panel.  I originally looked into buying curtains but I couldn't find a color I liked and they were all far more expensive than $20 a panel -- even at Tar-jay so making these was simple, quick  and cost-effective.


Up next: Homemade Nursery Mobile . . . stay tuned!!


Linking up to:


Tip Junkie handmade projects


The DIY Show Off

Today's Creative Blog

Spunky Junky

Tuesday, March 8, 2011

Coupon Cowboy's Deal of the Week

I bet you thought Jason as the Coupon Cowboy was just a phase.

Nope.

The cowboy is still lassoing in deals week after week.

I have to say that we've been doing an AMAZING job saving money on groceries each week and it's been helping to get us one step closer to reaching our New Year's Resolution.


In fact, we already paid off one student loan . . . so we're on to tackling student loan #2.  I'll keep you posted.  So the couponing continues week after week.   We actually look forward to sitting down on Saturdays and going through the sales circulars and matching the sales with our coupons.


This past weekend Jason was busy finishing up the nursery closet, so I was actually the one who sat down and matched our coupons with the deals.  I did a pretty good job, scoring Colgate and Crest toothpaste for free at Rite Aid.

But as we were walking through the aisles at CVS collecting all of my deals, Jason saw a sale sign in front of a bunch of cleaning products that he was really excited about.  The deal was 2 cleaners for $6.  If you bought $12 worth of cleaners, you would receive $4 in CVS bucks when  you cashed out. 

Jason was determined that if we had coupons for each of the cleaning supplies, we could get each cleaning agent for about $1 each. 

So out came the ever-growing coupon caddy and out came Imani's sighs as her crazy couponing parents began searching frantically for Pledge, Windex or Shout coupons.

We searched and searched through the dozens of cleaning coupons, but couldn't find one. 

But the cowboy kept looking. 

And this pregnant shopper plopped herself on the floor of CVS with her legs criss-cross applesauce right in the middle of the cleaning supply aisle and sorted through coupon after coupon.

I'm certain Imani must have been quite embarrassed.

Eventually, we gave up and left CVS without the cleaning supply deal, although we did get a lot of other great purchases.

I had long forgotten the cleaning supplies, but the Cowboy did not.

Last night he was on the computer and I assumed he was checking sports scores or reading the news online but really he was searching for cleaning supply coupons . . . and (of course) he succeeded. 

He was so excited to have found two $1 off any Shout product coupons, two 75 cents off Pledge "multi-surface" coupons and one coupon for buy any Wood Polish Pledge, get a Pledge "multi-surface" for free.

He was beyond excited and wanted to head off to CVS to make his purchases . . .


but we have a bedroom wall that needs painting so CVS had to wait.

Last night, the Cowboy was tossing and turning in bed.

I thought maybe he was nervous that I was going to go into labor or something, so I asked him what was keeping him awake.

"I can't stop thinking about the CVS deal."

Seriously.

Seriously?!

And then tonight, when I took Imani to her violin lesson, I received this text message from Jason:


"I feel like I just stole from CVS."


And that text message was followed by this one:


"$4.50 before tax at CVS."


That's 90 cents for each of the above products.


And now we are thinking we might need to build an addition to start housing all of the extra cleaning products.

Either that or everyone is getting a basket full of cleaning supplies for Christmas.

Who knows, maybe the nesting instinct will kick in and I'll use up all the cleaning supplies in the next couple of weeks!


Nursery Closet Complete

For those of you who have asked or are wondering . . . no, I haven't had the baby yet.  I'm actually due in two and a half weeks on March 24

so . . .

 . . . . my belly continues to grow 

. . . .we continue to do projects around the house to get ready for our newest family member

. . . I continue to work full-time (which is why I haven't blogged in a week)


. . .  we continue to toss around baby names


and I cherish every minute of the miracle that is pregnancy.


I am happy to say that the nursery is almost complete.  I just hope we finish it before the baby gets here, even though he'll be sleeping in our room in a bassinet. 

Our most recent nursery project was to address the closet.  Initially, Jason was just going to paint the interior of the closet white, but in my quest for storage because we live in such a small house, I had bigger plans.

I wanted a closet that was divided with two hanging bars, to accommodate little clothes. 

I also knew I wanted baskets in the closet to provide attractive storage for all things baby.


Finally, I knew I wanted a pattern inside the closet - either stenciled or wall-papered. 

And I knew I was probably driving my husband crazy with my wishes for a cute closet.

So we set out for Lowes and looked at their closet organization systems.  I almost fell over when I saw the price tag on these systems.  Some were as much as $400 and none offered the simplicity I was looking for in such a small space so I asked Jason if he'd be willing to build what I envisioned.

He said yes.

So we purchased some lumber, some hanging bars, some wallpaper, and some baskets and we headed home on a mission.

First, we had to clean out the closet that once served as a catch-all for crafts, the vacuum cleaner, miscellaneous papers, artwork and who knows what else.


It was actually much worse than this . . . but Jason had already started to clean it out and was insistent I NOT take a picture of the mess.  Fortunately, I snuck in and took the photo when he was off finding new homes for some of the junk.  Otherwise, you wouldn't be able to appreciate the transformation.

Once the closet was cleaned out, Jason went in and spackled all areas that were rough or had little nail holes to ensure the wall paper would go on smoothly.


Once that dried and he sanded it down, the wall paper went up.  I never knew how messy installing wallpaper was but it was worth all of its gooeyness. 

Unfortunately, I didn't get a picture of the goo but every time Jason would smooth out the wall paper a big mess of glue would seep out from under the wall paper.  Maybe we didn't wait long enough to  put it on or it was too wet.  


In any case, I absolutely love the way it turned out.


Next, my dream maker began building shelves to house the baskets.


And before I knew it, there were a couple of shelves and a couple of rods to hang little clothes.


Finally, the shelves were primed and painted white and my vision became a reality.


I put all the little adorable clothes in there and filled the baskets with blankets, toys and other baby items we'll be using in a couple of weeks.

I love that the stroller fits in there tucked away in the corner.


Wow! I still can't believe the before and after!

                                                              Before:


After:


 I still want to get all matching baby hangers since currently some are blue and some are white but I wasn't going to wait to post this until I waddled over to Tar-jay to get matching hangars.

I'm so glad we didn't spend all of that money on the closet organization system from Lowe's!


And Jason is glad I took a "before" picture.


Stay tuned this week for more nursery updates!

Linking up with:


The DIY Show Off


Related Posts with Thumbnails